

Accessing steam screenshot folder is not something easy as you thought of, You have a stunning scene to capture from one of your favorite games, or you’re probably trying to fix a problem you’re encountering while playing. Or trying to take a screenshot using Steam’s built-in shortcut key makes the process astonishingly easy — finding the screenshot directory isn’t as intuitive.
Don’t worry though, In this post, I’ll show you how to find Steam’s screenshot folder, using the client itself as a whole or directly using your file system.
How To Find Steam’s Screenshot Folder Using The Steam Client
The process to find Steam’s screenshot folder is simple, if you choose to find using Steam itself as follows:
Step 1:
In the menu bar, click on “View” and select “Screenshots.”
Step 2:
From the drop-down menu. Suppose you have taken any screenshots, they’ll be available here where you’ll get other options and their features.
Step 3:
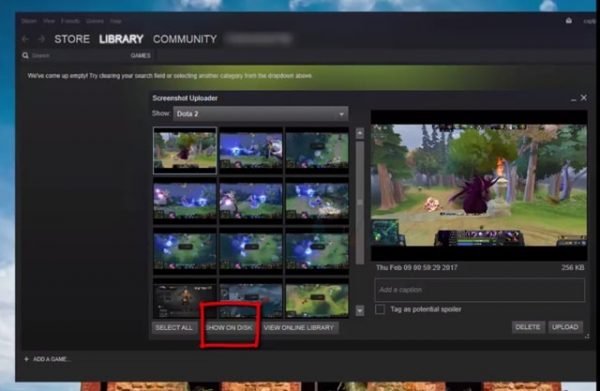
At here, what you’ll be searching for is the button-down option at the bottom that says “Show On Disk.”
Step 4:
Click on the “Show On Disk” option to launch your system’s file explorer in the directory where that particular screenshot is stored.
If you can’t access the Steam client for whatever reason, then you need to find the image file Steam stored in your system. The directory may be vary depending on which system used.
SEE ALSO:
- Where Do I Find My Google Chrome Bookmarks Folder
- Tracking iPads: Best Way To Track An iPads Stolen
- How To Block A Phoe Number On A Samsung Galaxy
How To Find Steam’s Screenshot Folder Using Your Computer’s File System
Firstly, the place to start is by moving to Steam’s installation directory:
On Windows 8 and 10. Note that the default directory is C:\Program Files (x86)\Steam.
While on a Mac, the default directory is Users/{username}/Library/Application Support/Steam, Note that the username is the Mac username and not the Steam username.
Using the Linux system, the default directory is ~/.local/share/Steam.
Suppose you already installed Steam somewhere else in your system, you’ll need to move to the Steam folder wherever it stored files. Once you’ve found Steam’s installation directory, then you need to perform the following steps to locate the screenshot:
Step 1:
Move to the “user data” directory. Based on the multiple accounts you have set up in your Steam client, then you will see more than one folders with a number to identify them. Note that the user ID number is for each of the different accounts. There will likely be one folder in the overwhelming majority of cases, but if you have multiple users, it might take a little bit of checking to find the folder attached to your account.
Step 2:
Move to and open your “User Folder,” then search for the folder named “760”. Open that folder and also launch the other folder inside it called as “remote.”
Step 3:
Here is the tricky section: Just as every user has an ID, likewise, each game has a unique ID. If you have an extensive library of games. Clicking through each numbered folder won’t be the best way to find your screenshot. The best and more relaxed approach is to go to this website and locate your favorite game. You can also search by either the game title or by the ID of the game.
Step 4:
Lastly, Once you know your game’s ID, navigate to that folder, and launch it. Move to the folder named “screenshots,” All your stored screenshots will be available in this steam folder directory.