
As Dstv keep increasing their tariff every day, DStv decoder become useless after the customers used the promo rewarded after purchased. In this tutorial, I gonna teach you how to use DStv Explorer decoder to scan any free to air (FTA) Channels. Before we go, Let’s quickly brief you about Dstv Explorer decoder.
About DStv Explorer Decoder
DStv Explorer decoder is a pay tv decoder owned by African Leading Entertainment popularly known as DStv. It is a digital satellite tv decoder with DVB-S complaint. DStv Explorer decoder capable of opening pay tv channels which is primary purpose. Using DStv decoder to watch any free to air (FTA) Channels is secondary purpose.
Features of DStv Explorer Decoder
- DVB-S tuner
- Fully High Definition
- 1x USB port
- HDMI
- Ethernet Port
- AV Jerk Port
- Parental control
- Hearing Impaired Subtitles
- Viewing And Recording
How To Scan Any Free To Air(FTA) Channels On DSTV Explorer Receiver
- First of all, remove the ‘LNB in’ cable at the back of the DSTV decoder.
- Power ON the decoder and ignore the notification messages displayed on the TV screen indicating ‘No Signal’.
- Press the DSTV or MENU or Blue button on the decoder’s remote controller.
- While on the menu, Navigate to ‘SETTINGS’.
- Choose ‘SATELLITE SETTING’.
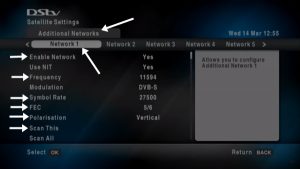
- Select ‘ADDITIONAL NETWORKS’.
- Choose ‘NETWORK 1’.
- Switch ‘Enable Network’ to ‘YES’.
- Now you will notice that other information in the network 1 window is editable.
- Scroll down to “frequency” and input the satellite TV free to air (FTA) frequency you want to Scan.
- Scroll down to “symbol rate” and input the symbol rate figure.
- Change the polarization to that of the satellite you want to track.
- Check the signal bar for signal status
- select ‘SCAN THIS’.
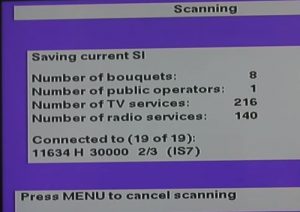
- Please wait for the scanning to complete.
- After the completion of the scanning; Dial ‘221’ on the remote control.
- Press and go to the “Channel List” and you will see the free to air (FTA) channels added to the list.
- Select the channel you want to watch and enjoy.
If owned an old Dstv decoder you can follow up below and how to scan free to air (FTA) Channel on it
For Old DStv Box
- Press “MENU” and navigate to “ADVANCE OPTION”, Tap on “DISH INSTALLATION”
- Press “9949” as default “PIN Code“
- Don’t touch anything on “Home Network“
- Scroll down to “Network 2” or any other next “Network“
- Tap and switch the option to “Enable Network 2“
- Select “Satellite” you want use for scanning. For instance, EW4 or EW7.
- Tap on the Satellite Chosen and it will bring a window, where you enter the frequency and symbol rate of the Free to air (FTA) channels you want to scan.
- To “SAVE” Settings, Go to line 11 and accept all displayed settings. Once finished, on line 8 of the new window, Navigate and click on “scan all networks“
- Once done with scanning, Press TV button on your remote control and Tap on the “Public Bouquet” and you will Find all the free to air (FTA) channels Available on the Satellite.
This is step by step guide on how to scan free to air (FTA) channels on DStv Explorer Decoder. If you find this tutorial useful, don’t forget to share with your friends and family, You can share across the social media. If find any difficulty on satellite tv and other related to niche feel free to contact us.
SEE ALSO:
- Nigeria Mux Package On Intelsat 33e At 60.0e: How To Track?
- TStv is Back (July 2019): New Satellite, Frequency, Position And Channels
- L’OBS TV Senegal Now Showing 2019 Copa America For Free
- Updates On TSTV Africa: New Frequency, Channels lists And Position
- Multi-TV Origin, Frequency, Channels And The Installation Guide
- Nigcomsat-1R Origin, Frequency, Channels And How To Track
- MBC Package Review, Frequency, Polarization And Symbol Rate
- DStv/GOtv Promo 2019 Tagged Upgrade, Step Up And Boost Package
Plz if you want to explain something, plz try to put example. Cos I don’t understand what you mean sir, by the frequency in put of the channels and the Symbol of the channels, plz sir can you use one channel for example????
follow the steps on the post
So you think peope around knowing frequencies in their heads. If you want to explain something, explain it well.
Ok thanks for your observations and I will look into it and make necessary corrections.
I’m also confused. At which point do you then plug the LNB back? You cannot watch if the LNB is still disconnected
I don’t understand what you mean, Can you please re-frame your question?
I like to lern
You welcome to learn from this webpage
When I scan the free to air on the dstv decoder, all the dstv channels disappear. Is only the free to air channel that is showing on the channel list, what can be the reason……….
try again, you missed some or a step