
In this tutorial, I will teach you how to flash firmware on Android TV Box using Phoenixcard tool. The steps involves is easy and straight forward even if you’re computer illiterate, don’t worry just try to get Phoenixcard Tool. If you’re just hearing Phoenixcard Tool for the first time, you can read more from previous tutorial here.
One of the great features while most of the people want to upgrade the TV Box is that, To devoid policy restrictions in order to add more features. This can enable the user to upgrade the Android TV Box and as well as flash firmware. The best way to do this is to flash the TV Box using the Phoenixcard flash tool.
Before proceeding to burning the SD Card or Flashing firmware, then you need to have the following requirements
Pre-Requisites
- A good working condition laptop or PC
- Android TV Box running AllWinner Chips
- Download and Install Phoenixcard Tool on your laptop or PC
- Download the ROM/Firmware according the Android TV Box chipset, you can download from here
- An empty MicroSD card or SD card
- An External Card Reader
- A toothpick
Guides To Flash Firmware On Android TV Box Using PhoenixCard Tool
1. Download the and prepare the firmware (Extract it to filename.img file, if the downloaded file is img format, then no need to extract it again.
2. Connect MicroSD Card or SD Card to your PC or Laptop
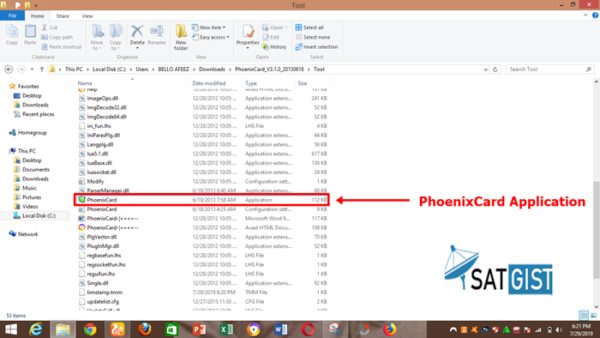
3. Launch the downloaded burning tool extracted file, Locate and run PhoenixCard.exe, the computer system will automatically identify the inserted SD Card (Note that you need remove all the external storage connected to system except SD Card to use) , An interface will appear like shown below
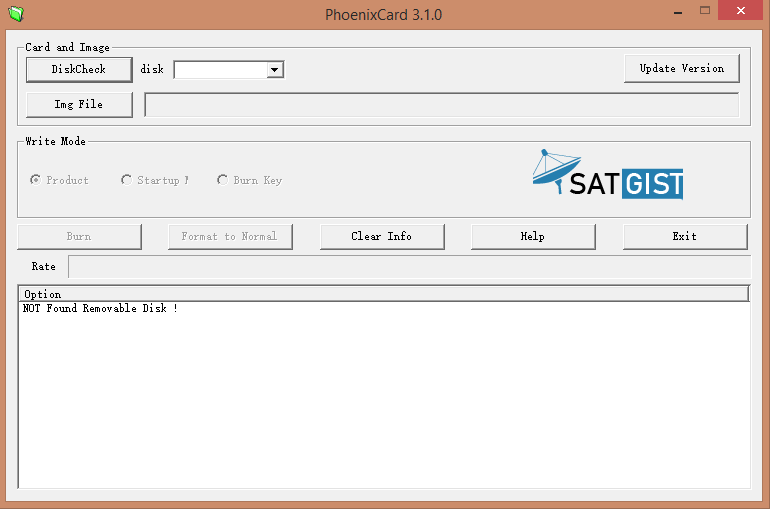
4. Tap on the image file button, locate and select the firmware you want to burn (filename.img downloaded from the official source)
5. Tap to burn (Note that this process will automatically format the SD card before burning, If there’s any other important data in the SD card need to be backup first), After the system prompts finish writing, then click on “Exit” and remove the SD Card.
SEE ALSO:
- Mecool KM9 Pro Classic (Google Certified) Android TV Box
- 2019 Pendoo X5 Pro 4K Ultra HD Android TV Box Review And Specs
- 2019 Allwinner R69 Android TV Box Review And Specifications
- X2 Cube Android TV Box Features Android 9.0, S905X2, 2GB/16GB
- Android TV Box/Mini PC VS Mobile TV- Everything You Need To Know
- Download Latest version Of Phoenix Card Tool And How To Use It Works
Guides To Flash Android TV Box
1. First of all, make sure that the Android TV Box is powered off ( disconnect the power cord from the socket)
2. Attach the MicroSD Card into the Android TV Box via the SD card terminal or slot
3. Insert the Toothpick on the Reset (usually found on AV port) press and hold, then Plug the power cord to the wall socket for 10 Seconds, The box will automatically start flashing the Android TV Box with indicator light.
4. After the indicator light stops flashing, then firstly, disconnect power cord, remove the SD Card (At this moment, Flashing processing is completed)
5. Plug the Power Cord of the TV Box and wait till first booting completed (usually up to 3-5minutes)
Alternatively,
How To Flash Firmware on Android TV Box using PhoenixCard Tool
- Download the firmware and make sure PhoenixCard tool is installed on your PC or laptop
- Connect the SD card to PC or Laptop using the Card reader
- Click on the img file button to add the firmware (filename.img)
- Tap on the Burn Button to write the firmware into the virus free SD card (existing data will be lost) and the flashing usually take 5-8minutes
- Immediately, the message appear that “Firmware writing to SD card is successful”
- Remove the SD Card from the PC and connect it to the TV box
- Press and hold the power button of the TV Box to boot up
- The flashing process will be start automatically and wait till flashing process completed
- Once the flashing process completed, remove the SD card
- Plug power cord and wait for the first boot up to completed usually less than 5minutes.
That’s what I have for you today, I hope you find this tutorial interesting, don’t forget to click on share icon to others to benefits, This is How To Flash Firmware on Android TV Box using PhoenixCard Tool.